![]()
![]()
![]()
![]()
![]()
![]()
![]()
![]()


![]()
![]()

![]()

![]()


![]()
Motorcycle rebuildingΑνακατασκευή μοτοσικλέτας
(after the trip)
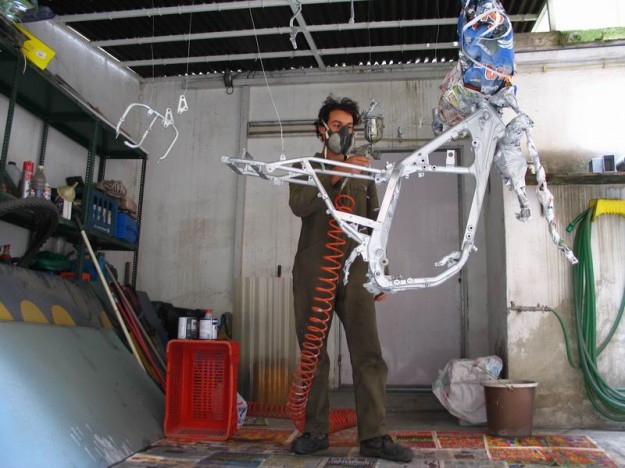
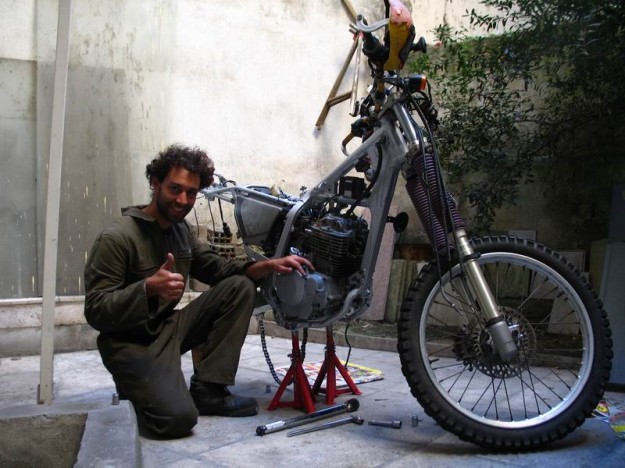
One year after my return in Greece, I decided to rebuild my XR, which was just resting for all this period. I didn’t take that decision because I love that motorcycle, as most people would imagine. I did it because I wanted to become even more familiar with the mechanic parts of a motorcycle, in order to be better prepared for my next trip. Before this trip, I was working for free in a repair shop for cars, in order to learn the basics. I saw there the master disassembling and assembling many engines. I knew the procedure in theory, but I had never done it by my-self. So, it was time to give it a try!
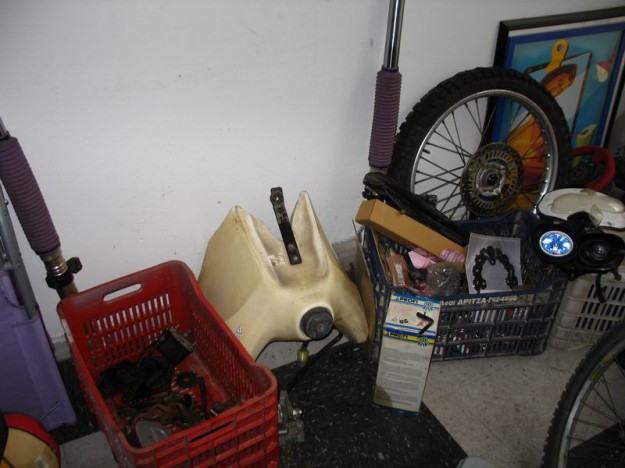
Rebuilding was not just on the engine, but on almost every part of the motorcycle. All of them had worked for many tens of thousands of kilometers and they had worked in tough conditions. So, they needed some care. I removed everything from the frame, except the handlebars and the triple clamp (also known as “triple tree” or “yoke”). I checked again and again the steering head bearings and they had no dents, roughness, looseness or freeplay. They have rollers instead of balls, so there is a bigger friction area that helps to keep the outer race of the bearings unworn (the head bearings of my Africa Twin, which use balls, were making dents every a few thousand kilometers…).
That’s the small engine that let me travel in Asia for 2 years and 2.5 months!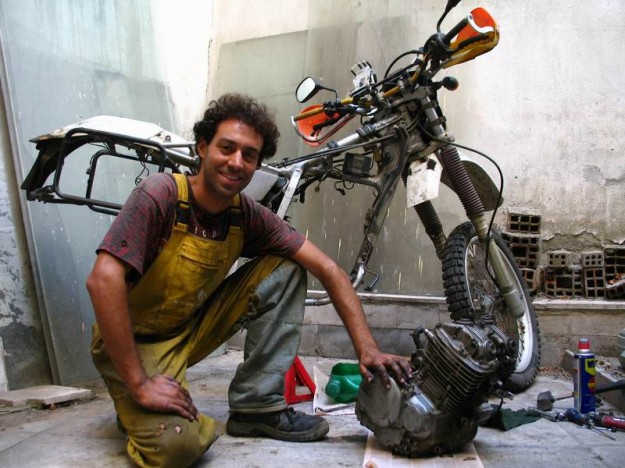
I disassembled the engine with the help of the manual, to be sure I will not make any mistake.
That’s the manual (it was traveling with me in Asia and that’s why it became like that at the bottom of my pannier. Happily, I didn’t need it during my trip).

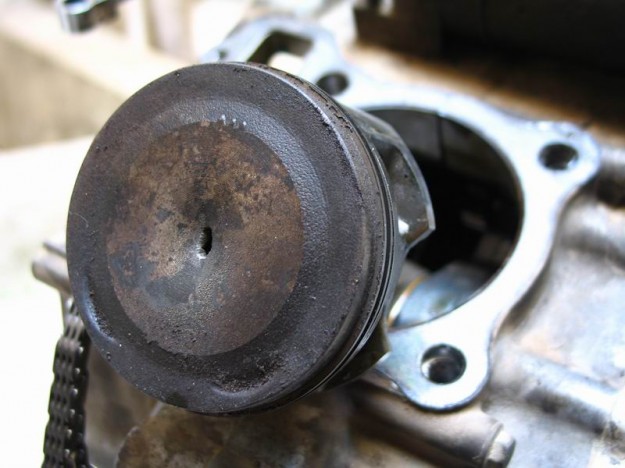
I disassembled the engine and I was surprised to see that the reason it stopped working just 60 km. (37 miles) before I reached Greece was not what I was expecting. I knew that there wasn’t enough compression in the engine, but I didn’t know that the reason was a hole on the piston!
The question is “why did that happen”. I guess the main reason was that some fuel or air passages in carburetor’s body were partially blocked or oversized. I realized that at the end of this rebuilding, when the repaired engine had the same problem that it had during the last part of my trip. When they adjusted my carburetor in Kyrgyzstan (at the same time I changed the carburetor’s diaphragm), I noticed that the adjustment was wrong and I told it to the master. However, maybe the problem was not on the adjustment, but on the fuel or air passages. He told me to go to a specific master in the capital, but that one didn’t know either how to adjust a carburetor on a motorcycle like this. When the engine was cold and I was accelerating suddenly, the engine was running poor and it was nearly stopped. I had to pull once the choke lever for a moment while I was accelerating and then everything was working fine. That means that the carburetor was providing more air and less fuel, which leads to abnormal burning of the mixture and that caused the hole on the piston after a few tens of thousands of kilometers.
Everything I tried in order to clean the carburetor during this rebuilt did not have any results. I removed it and I put it on the bike ten times approximately! Initially, I cleaned its metal parts just with cotton and alcohol, but it didn’t work out. Then, I cleaned its metal parts with solvent for carburetor cleaning and compressed air, but there was no change. I replaced the main jet with a slightly bigger one, but the problem was persisting. I cleaned the carburetor again and again, but without any success. At the end I gave it to a repair shop to clean it by ultrasonic bath, but that made it much worse! Since then, the engine could not start. It was behaving like flooded from fuel. I achieved two or three times to start it with many tricks, but it was working very badly and only while I was holding the throttle fully open.
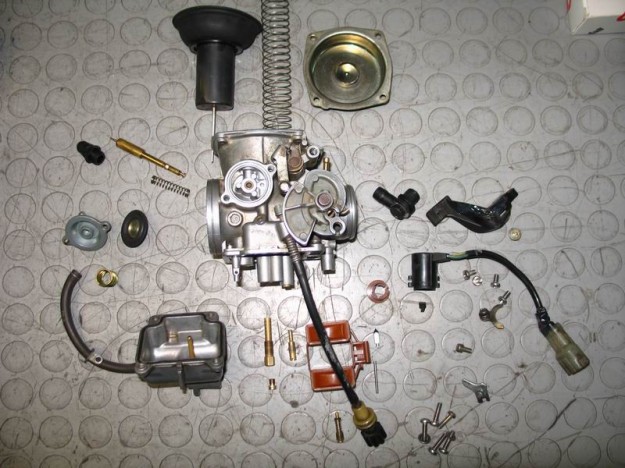
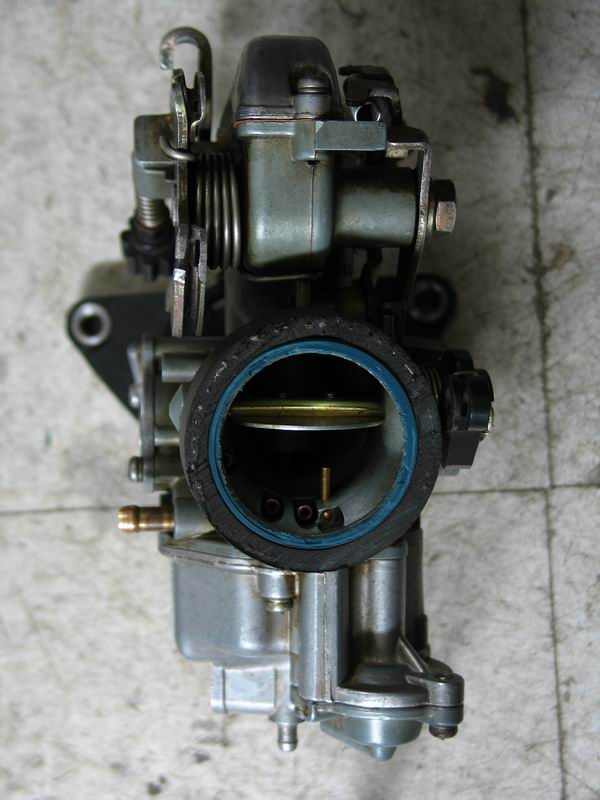
One of the many times I disassembled the original carburetor in order to clean it in detail.
The problem was on carburetor’s body, so I could not fix it. I had to change the whole carburetor. Happily, lspyros, a member of the internet forum moto.gr, offered me an old carburetor from a Honda XLR 250 1989. I am grateful to him for that. I did the required modifications to fit it on the air filter box and to install the throttle and choke cables. It worked immediately! I was so happy to hear my XR’s engine to work again properly!
The hole on the air filter box is larger than the intake of the XLR’s carburetor. So, I put a rubber tube with a metal ring inside (from a cut seal) which resists on the clamp.
Except this, it was clear that the piston was working without oil for a while, it was stuck and it got automatically unstuck in a moment. Look at the scratches on the piston’s sides.


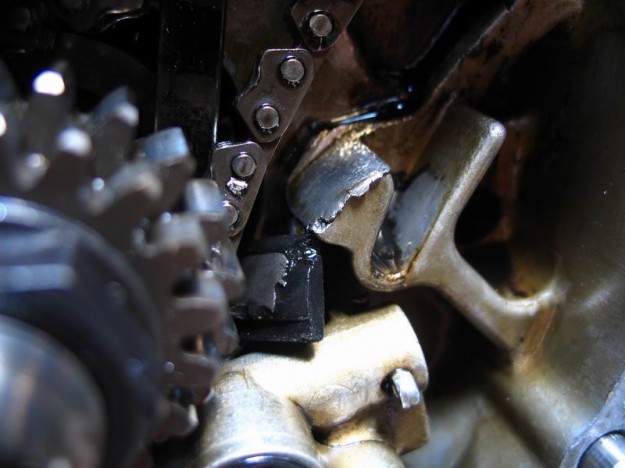
But why there wasn’t oil around the piston? That’s what surprised me the most when I saw it! Look at the situation of the cam chain tensioner and slider.

You can see at the top the tensioner without the rubber, which was broken. At the bottom you see what was left from the slider. All this metal stick is surrounded by rubber normally and you cannot even see the metal!
Don’t you wonder where all these rubber parts were? Well, they were all around the engine. I found them in the clutch compartment, in the oil pump, even in the seat of the oil strainer screen. That seat was blocked by the rubber parts and probably there wasn’t room for enough oil to pass through the screen.

Some of the rubber parts I found in the clutch compartment..
Since there wasn’t any slider, look where the cam chain was sliding for some hundreds of kilometers (maybe even for some thousands of them).
There should be much more material on that metal part. That's why the oil filter was silver from the small parts of aluminium which were circulating around the engine.
In addition, the oil strainer screen on the frame, at the bottom of the tube which doubles as an oil tank, was blocked from the small parts of aluminium. Look how it was!!!
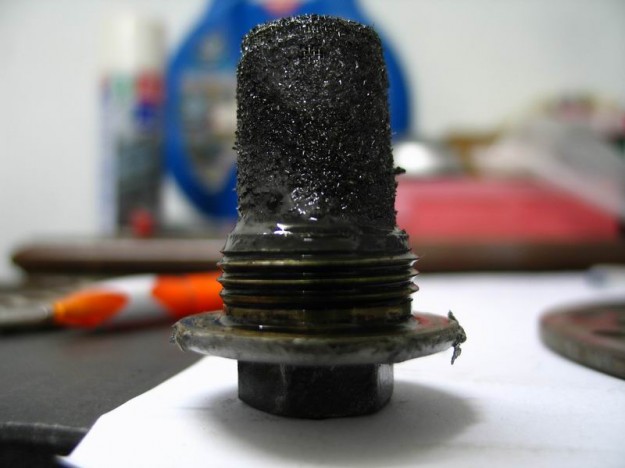
How could oil pass through this mesh (or mess)?
Look at it after cleaning to see how it should be.

So, another reason that helped to make the hole on the piston was that it was working without oil for a while, the temperature in the combustion chamber got extremely high and preignitions occurred, which produce extremely high pressure in the combustion chamber and that’s why the hole was made. Except this, when I was preparing the motorcycle for my trip, some material from the top of the piston was removed, because this piston was higher than the normal. Don’t forget that this version of XR is so rare that it’s difficult to find spare parts in Greece. We had used an original Honda piston for the usual XR 250. In order to realize how much material was removed, look at the first photo of the piston at the beginning of the rebuilding chapter. At the inner side of the piston (up in the photo) you can see some small relief lines. Those lines were making the word “IN”. It’s interesting also to compare the holey piston with the new one.


Of course, even if material was not removed from the top of the piston, the hole would occur, since it’s inevitable when abnormal ignitions take place.
In conclusion, our mistake during the preparation of the motorcycle for the trip was that we replaced the cam and the cam chain, but we didn’t replace the tensioner and the slider. The thing is that I was planning to travel much less than I actually did. I couldn’t imagine that I would end up traveling for 73,000 km. (45,361 miles). It was a pity, because I thought that the XR’s engine reached its limits. However, it’s clear that if the carburetor was adjusted right and if the tensioner and slider were changed during the previous engine overhaul, this small engine would offer me many more thousands of kilometers. During this rebuilding, instead of removing material from the top of the piston, I decided to give some more room to the combustion chamber by putting a second gasket under the cylinder. This way, the small height difference of the piston will not be a problem.
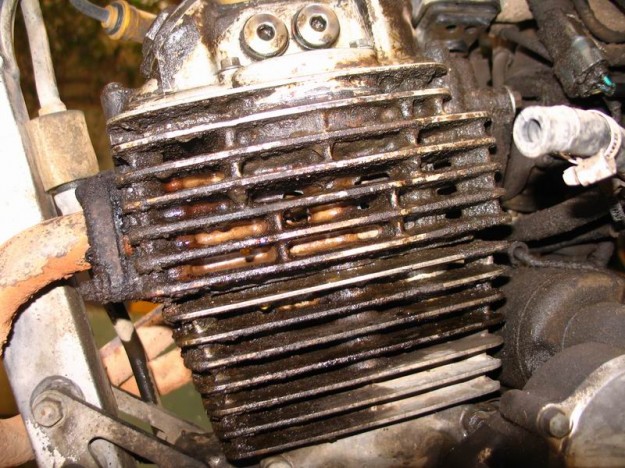
The valves didn’t have as much dirt as I was expecting, because most of the oil I was adding in the engine liter by liter was just leaking through the gaskets and only a small amount of it was burnt in the cylinder. However, the two exhaust valves had some small hollows at the surface which contacts the head, so I changed them.

I had written at the end of my trip about the excessive amount of oil that was leaking through the engine’s gaskets and that the wind was blowing it on my boot and even on my pannier. Look what a dirt I had to remove from the engine (and from any other part of the motorcycle).
The important thing was that there wasn’t any crack on the engine’s head, because in that case I wouldn’t be able to pay so much money to fix it. There is a rumor about the XR’s that a crack appears at the head close to the spark plug’s hole. Everyone was thinking that my XR’s head would definitely have a crack and that would be one of the reasons the engine was not working. I had researched a lot this rumor before selecting this motorcycle for my trip. An experienced and trusted man from Honda had told me that the crack appears because of wheelies. Oil doesn’t go to the engine because of its inclination during the wheelie. I have never made a wheelie even by bicycle, so that was not a problem for me. As it is proofed from the perfect condition of my engine’s head, the man from Honda was probably right.
During more than two weeks my goal was to empty the left crate, which had the spare parts I was removing from the bike and to fill the right crate. After cleaning patiently everything, I was taking care of it and I was repairing it, if it was necessary. When it was ready, I was putting it in the right crate together with the new spare parts which were arriving day by day. So, I was very happy when the right crate was full!
I replaced preventively the piston seals of the brake calipers. The fluid seals were OK, but the dust seals were in a bad shape.

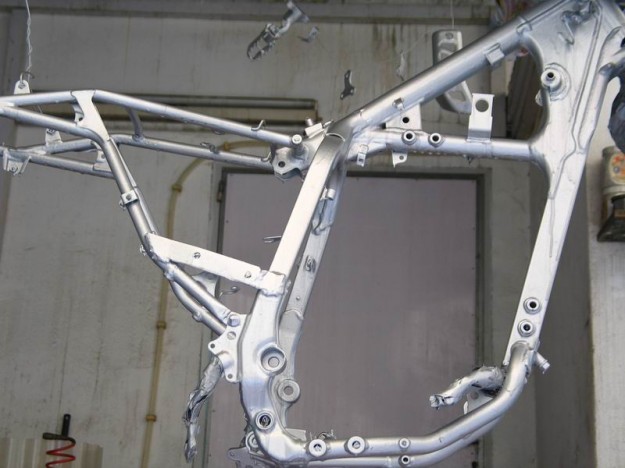
Let’s talk about the frame now. First of all, it should be washed by petrol (diesel or whatever).
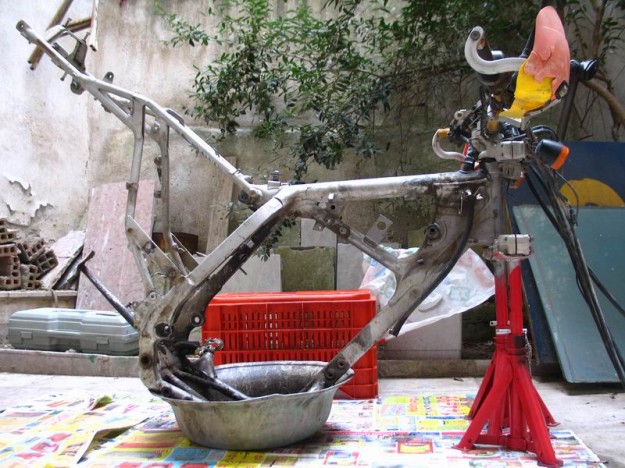
…that’s my clean frame:

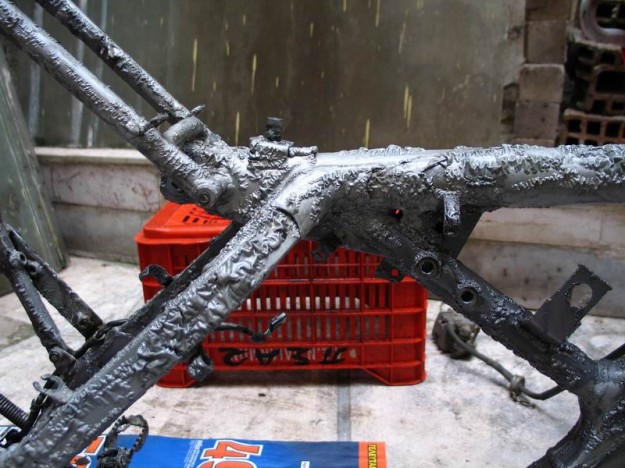
You see two different colors because before I left for my trip, I had painted the frame without removing all these parts I removed this time. So, I had painted only the parts of the frame that were not covered by the motorcycle's parts.
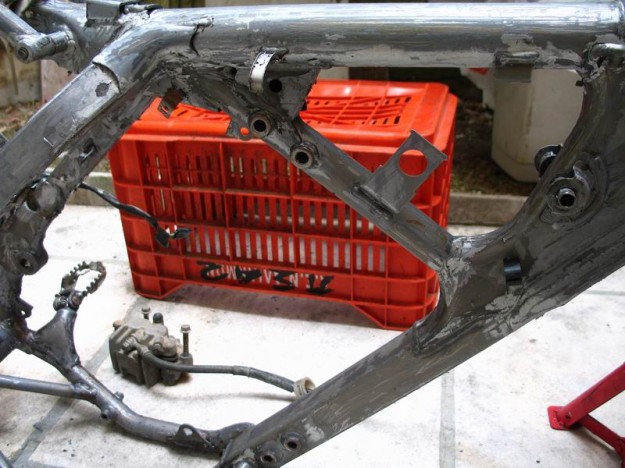
Then, I used a magic paint remover! I spread it on the paint, I waited a few minutes and the paint was peeled.
…I scratched it by a slice and most of the paint was removed leaving this wonderful color of the naked metal. How enjoyable it is to remove the paint so easily without sandpapering for hours…
Since the paint was removed, I took the frame to a welder. There was a big crack around the side-stand’s mount. It’s expected, if you consider that it was not designed to support the weight of the XR plus 90 kg (198 pounds) of load!
Then, I had to apply a primer on the frame and re-paint it.
It’s ready!
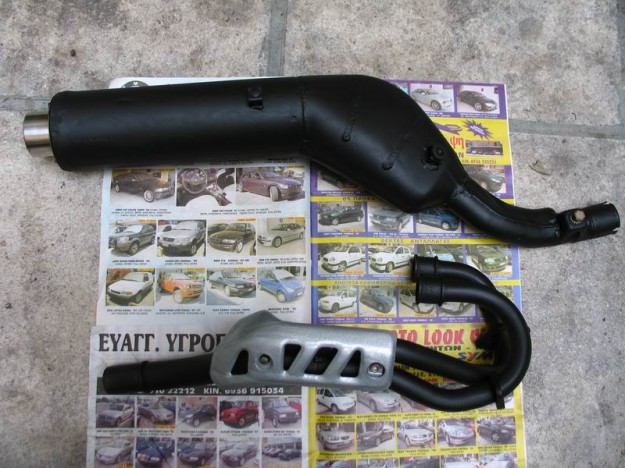
I had to paint the exhaust too, but first of all I had to sandblast it in order to remove the old paint, the rust and the mud which was grilled on the hot exhaust and had become a part of it.

The exhaust is ready too!
It was time to try something I had never done before and I had never even seen someone else doing it, since I was working in a repair shop for cars and cars don’t use forks at the front suspension. I was only helped by the manual. I disassembled completely the fork legs, I changed their oil and their oil and dust seals, because a little bit of oil was leaking through them during the last part of my trip. I was very careful with all these parts of the suspension, but now I know how to do this too and I can do it again easily.

After a lot of searching and waiting for the original spare parts, I finally had them on my hands! One of my favorite moments during the rebuilding was when I was opening all those unreasonably expensive packages from Honda and I was putting the parts one by one on the engine. Girls enjoy shopping therapy with clothes. I do the same with spare parts 😉

…I am putting the cylinder carefully.

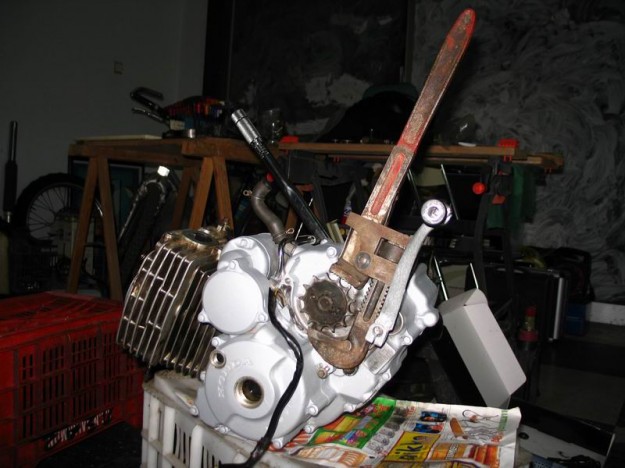
In order to tighten the clutch nut, I had to prevent the clutch housing from turning. I applied the trick with the rag which blocks the gears when I was disassembling the engine, but I didn’t want to do that again, because everything would be full of rag pieces once again. So, I thought this:

I put a gear in the gearbox, I put the old sprocket on the shaft and I kept it with a pipe wrench. So, I did a clean and effective job!
Finally, the engine is assembled! I painted its covers, but not the cylinder, the head and the head cover, because I didn’t want the color to heat-insulate the engine and reduce its cooling effect.

In the next rebuilding of my XR I will turn it to a chopper! It will look like this:

The frame is ready for the engine.

The day I installed the engine on the frame was a glorious day! I was very happy about it! I was feeling that my motorcycle will be ready soon and I will be on it rolling around the mountains and the plains again!
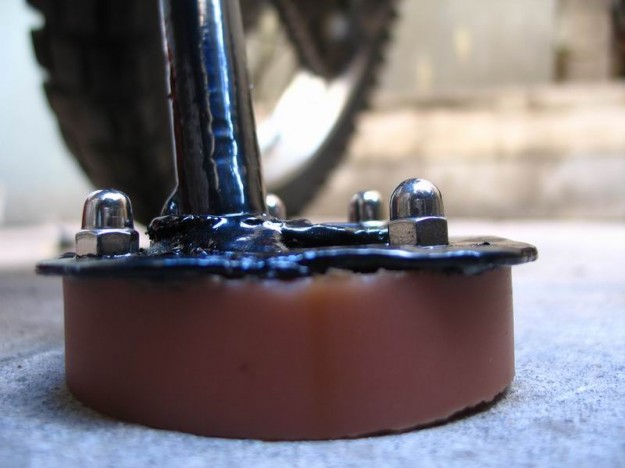
I did another one improvement on the sidestand. The bigger surface at its bottom, which I welded before my trip, is useful in the sand and other kinds of soft ground. However, I had to give some height to the sidestand, because when I was parking the bike, it was leaning too much. Usually, I was putting a stone beneath it or whatever I could find there. So, I added 2 cm. (0.79 inches) of polyurethane at the bottom of the sidestand. It seems that’s the ideal material for this use, because it is elastic and it hooks better on the ground than metal or teflon.

In the meanwhile, I got the K&N air filter I ordered from Germany. This XR version uses a very rare air filter, which Honda sells at the usual extremely expensive price. I decided to install a K&N filter which never needs to be replaced. It was difficult to find the right filter. I found out that the XR 250S (I think Baja too, but I didn’t check it) uses the same filter with XR 650L constructed on 1993 or later. The Honda part number for that filter is: 17214-MY6-670, while the K&N part number is: HA-6592.

You can see the original filter at the top of the photo and the K&N below.
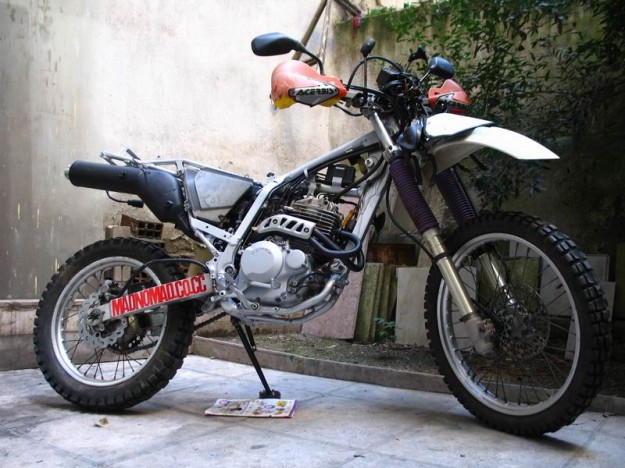
Almost everything is installed on the bike’s frame.
Finally, it was time to modify the bike’s electric circuit. There isn’t a switch to turn off the lights on this model, because it was designed for the U.S.A. market. In addition, the front turn signal lights are always on. When I want to turn and I switch on the appropriate turn signal, then that light is flashing. The battery on this bike is a small one, there isn’t a kick-starter and on top of these the lights were spending the electricity which was precious some times. The only choice in those cases was to unplug the connectors of the lights. So, I installed a switch to turn off the front and rear lights and the speedometer’s light. I did it on a way that allows me to have the front light’s low beam on when I switch on the high beam. When I need for a while more light, there are two 55-Watt bulbs working instead of one. The front turn signals are not always on anymore. They work as in the usual bikes we ride in Europe.

After one and half months of hard work, the motorcycle was ready for the first road test. Last time it went out of that door was more than a year ago.

At the videos below you can watch the wonderful moments of my rebuilt engine’s first start. I was very happy when I heard after so long that familiar sound of my XR, which was accompanying me during my trip in Asia. The most important reason for a hobbyist mechanic to be happy in such an occasion is the thought that he took apart a whole motorcycle which was not working, he repaired it, he assembled it and it works!
The rebuilding took me two months, 40 working days with an average of 8 working hours per day. The most time-consuming and less enjoyable work was the cleaning of all those parts I removed from the bike. I was washing them in detail with petrol or white spirit for more than a week. If it was necessary, I was using wire-brushes or sand-paper. The most enjoyable work was the engine’s assembling!

Exploring Epirus, Greece with Christina.

On the pass from Zagoria to Vovusa, Greece.
All the works I did during this rebuilding are reported in detail below.
Engine
- Reconditioning of the cylinder
- Replacing of piston
- Replacing of piston pin and circlips
- Replacing of cam chain
- Replacing of cam chain tensioner
- Replacing of cam chain slider
- Replacing of cam bearings
- Replacing of exhaust valves
- Grinding of valve seats
- Replacing of valve stem seals
- Replacing of o-rings on the round caps for valve adjustment
- Replacing of rocker arm for the exhaust valve which is closer to the clutch together with its adjusting screw
- Replacing of oil pump
- Replacing of gaskets between the gearbox and the cylinder, the cylinder and the head, the head and the head cover
- Replacing of cylinder’s screw which is next to the spark plug at the side of the clutch
- Replacing of cylinder head’s screw in front of the spark plug
- Cleaning of oil strainer screens in the clutch compartment and on the frame
- Replacing of washers for the tube which connects on the frame’s oil strainer screen
- Replacing of o-ring on the oil filter cap
- Construction of new thread for Ø 8 mm screws on the oil filter cap
Transmission and final drive
- Replacing of clutch compartment gasket
- Replacing of clutch nut
- Replacing of chain slider on the swingarm
- Replacing of chain slider below the swingarm, at the front
- Replacing of front sprocket
- Replacing of the seal behind the front sprocket
- Replacing of gear lever’s seal
Fuel and air supply
- Replacing of carburetor by Keihin PD 73A from a Honda XLR 250 1989
- Cleaning of carburetor
- Replacing of carburetor’s gaskets and o-rings
- Replacing of carburetor’s pilot screw, its spring, washer and o-ring
- Addition of choke cable
- Replacing of the intake manifold which connects the carburetor with the cylinder head together with its o-ring
- Replacing of air filter
- Replacing of the right petcock on Acerbis fuel tank with a universal Acerbis petcock
Exhaust
- Painting of exhaust
- Replacing of the gaskets between the exhaust pipes and the cylinder head ports
- Replacing of exhaust pipes studs
Suspension
- Replacing of swingarm bearings
- Replacing of the left swingarm spacer
- Greasing of rear shock’s arm & link bearings
- Replacing of oil seals, dust seals and oil on forks
Frame
- Painting of frame
- Painting of the rack for panniers
- Welding around the sidestand
- Addition of 2 cm. (0.79 inches) polyurethane under the sidestand
- Replacing of the red plastic cover for the rear lights
Wheels
- Replacing of front wheel’s bearings
- Replacing of rear wheel
- Replacing of rear wheel’s bearings and dust seals
Brakes
- Replacing of rear brake hose
- Renewal of brake fluid on front and rear brake systems
- Replacing of rear brake disc and pads
- Replacing of brake fluid seals and dust seals on the caliper pistons of front and rear brake system
- Replacing of pad guide on the rear brake’s caliper
- Replacing of rubber boot on the front brake’s caliper
- Replacing of bleed valve on the rear brake’s caliper
- Replacing of dust seals on the rear brake’s lever
Electrical system
- Addition of a switch to turn off the low beam of the front light and keep it on when I switch on the high beam and to turn off the rear light and the speedometer’s light
- Modification of the front turn signals to stop them being always on and to make them work as the rear turn signals
- Soldering of the fuse box for the GPS
- Replacing of high beam indicator’s bulb
Accessories
- Cleaning of speedometer
- Replacing of speedometer cable
- Cleaning of panniers and repairing their lights
(μετά το ταξίδι)
Ένα χρόνο αφού γύρισα στην Ελλάδα, αποφάσισα να ανακατασκευάσω το XR μου, που αναπαυόταν τόσο καιρό. Δεν το έκανα επειδή είμαι συναισθηματικά δεμένος μαζί του, όπως θα σκέφτονταν οι περισσότεροι. Το έκανα επειδή ήθελα να εξασκηθώ ακόμη περισσότερο στα μηχανολογικά έτσι, ώστε να είμαι πιο καταρτισμένος στο επόμενο ταξίδι μου. Πριν ταξιδέψω, δούλεψα αφιλοκερδώς για ένα χρόνο σε συνεργείο αυτοκινήτων, για να μάθω τα βασικά και εκεί είδα αρκετές φορές το μάστορα να λύνει και να δένει κινητήρες. Ήξερα τη διαδικασία θεωρητικά, αλλά δεν το είχα κάνει ποτέ μόνος μου και ήταν πια καιρός να το επιχειρήσω.
Η ανακατασκευή δεν αφορούσε μόνο στον κινητήρα, αλλά σε όλα σχεδόν τα εξαρτήματα της μοτοσικλέτας, αφού είχαν κάνει πολλές δεκάδες χιλιάδες χιλιόμετρα και μάλιστα σε δύσκολες συνθήκες, οπότε χρειάζονταν περιποίηση. Αφαίρεσα τα πάντα από το πλαίσιο, εκτός από το τιμόνι και τη μάνα, αφού σιγουρεύτηκα ότι τα άτιμα τα ρουλεμάν του τιμονιού δεν είχαν κανένα απολύτως κενό! Είναι κωνικά και έχοντας μεγάλη επιφάνεια τριβής με τους κυλίνδρους που διαθέτουν, δε φθείρουν τη φωλιά τους όπως συμβαίνει στα ρουλεμάν με τις μπίλιες (τα ρουλεμάν τιμονιού της Africa Twin, που είναι με μπίλιες, κάθε λίγες χιλιάδες χιλιόμετρα μου εμφάνιζαν κενά…).
Αυτό το κινητηράκι με ταξίδευε για 2 χρόνια και 2,5 μήνες στην Ασία!
Λύνοντας τον κινητήρα με τη βοήθεια του manual, για να μην κάνω κανένα λάθος.
Το manual, που ταξίδευε κι αυτό μαζί μου στην Ασία και κατάντησε έτσι στον πάτο της βαλίτσας μου. Τότε αχρείαστο μου ήταν, ευτυχώς.
Έλυσα τον κινητήρα και με έκπληξη διαπίστωσα ότι τα αίτια για την παύση της λειτουργίας του 60 χιλιόμετρα πριν φτάσω στην Ελλάδα δεν ήταν αυτά που νόμιζα. Ήξερα ότι δεν υπήρχε αρκετή συμπίεση μέσα στον κινητήρα, αλλά όχι επειδή τρύπησε το πιστόνι!
Γιατί συνέβη, όμως, αυτό; Ο κυριότερος λόγος, μάλλον, ήταν πως κάποιοι αγωγοί στο σώμα του καρμπιρατέρ είχαν βουλώσει ή διευρυνθεί. Αυτό φάνηκε στο τέλος της ανακατασκευής, όταν ο επισκευασμένος κινητήρας συνέχισε να εμφανίζει το πρόβλημα που είχε και προς το τέλος του ταξιδιού μου. Όταν μου ρύθμισαν το καρμπιρατέρ στο Κυργιζστάν (με την αλλαγή της μεμβράνης), φαινόταν ότι δεν το είχαν ρυθμίσει καλά και τους το είχα πει. Ίσως, όμως, να μην έφταιγε η ρύθμιση, αλλά το πρόβλημα στους αγωγούς του καρμπιρατέρ. Με έστειλαν σε άλλο μάστορα στην πρωτεύουσα, αλλά ούτε εκείνος ήξερε πώς να ρυθμίσει το καρμπιρατέρ σε μια τέτοια μοτοσικλέτα. Όταν ο κινητήρας ήταν κρύος, αν γκάζωνα απότομα, κόντευε να σβήσει. Έπρεπε να τραβήξω για λίγο το τσοκ γκαζώνοντας μια φορά κι από ‘κει και πέρα δούλευε κανονικά. Αυτό σημαίνει ότι το καρμπιρατέρ έπαιρνε περισσότερο αέρα και λιγότερη βενζίνη, δηλαδή το μείγμα ήταν φτωχό, πράγμα που οδηγεί σε αφύσικες καύσεις, που προκάλεσαν την τρύπα στο πιστόνι μετά από λίγες δεκάδες χιλιάδες χιλιόμετρα.
Ό,τι προσπάθεια κι αν έκανα να καθαρίσω το καρμπιρατέρ κατά τη διάρκεια της ανακατασκευής ήταν μάταιη. Το έβγαλα και το έβαλα στη μοτοσικλέτα γύρω στις δέκα φορές! Αρχικά καθάρισα τα μεταλλικά του μέρη μόνο με βαμβάκι και οινόπνευμα. Δε δούλεψε σωστά. Καθάρισα τα μεταλλικά του μέρη με καθαριστικό για καρμπιρατέρ και πεπιεσμένο αέρα. Πάλι δε δούλεψε σωστά. Έβαλα λίγο μεγαλύτερο ζιγκλέρ, αλλά πάλι τα ίδια. Καθάρισα το καρμπιρατέρ, το ξανακαθάρισα, αλλά κανένα αποτέλεσμα. Στο τέλος το έδωσα να μου το καθαρίσουν με υπέρηχους, αλλά έγινε τρισχειρότερα! Από τότε ο κινητήρας δεν έπαιρνε μπρος. Συμπεριφερόταν σα μπουκωμένος από υπερβολική βενζίνη. Κατάφερα με ένα σωρό κόλπα να τον βάλω μπρος δυο-τρεις φορές, αλλά δούλευε τελείως χάλια και μόνο με πολύ γκάζι.
Μια από τις πολλές φορές που διέλυσα το αυθεντικό καρμπιρατέρ για εξονυχιστικό καθάρισμα.
Το πρόβλημα ήταν στο σώμα του καρμπιρατέρ κι έτσι δε μπορούσα να το επισκευάσω. Έπρεπε να αλλάξω ολόκληρο το καρμπιρατέρ. Ευτυχώς, προθυμοποιήθηκε ο lspyros από τη διαδικτυακή κοινότητα moto.gr να μου προσφέρει ένα παλιό καρμπιρατέρ που είχε από Honda XLR 250 του 1989 και τον ευχαριστώ γι’ αυτήν του την κίνηση. Έκανα τις απαραίτητες τροποποιήσεις για να το προσαρμόσω στο φιλτροκούτι και για να βάλω τις ντίζες και δούλεψε κατευθείαν! Η χαρά μου δεν περιγράφεται όταν άκουσα τον κινητήρα του XR μου να δουλεύει και πάλι σωστά!
Η τρύπα στο φιλτροκούτι έχει μεγαλύτερη διάμετρο από την είσοδο του καρμπιρατέρ του XLR. Έτσι, μεσολάβησα ένα μικρό κομμάτι ελαστικής σωλήνας με μια κομμένη τσιμούχα μέσα, για να κρατήσει αντίσταση στο σφίξιμο του σφικτήρα.
Εκτός αυτού, ήταν φανερό πως το πιστόνι είχε μείνει για λίγο χωρίς λάδι, κόλλησε και ξεκόλλησε από μόνο του στιγμιαία. Κοιτάξτε τα γδαρσίματα στα πλαϊνά του πιστονιού.
Γιατί, όμως, έμεινε χωρίς λάδι το πιστόνι; Εκεί είναι που τρόμαξα όταν το είδα! Κοιτάξτε πώς έγιναν ο τεντωτήρας και η γλίστρα της καδένας του εκκεντροφόρου.
Επάνω φαίνεται ο τεντωτήρας χωρίς το λαστιχένιο κομμάτι που έσπασε και κάτω φαίνεται ότι απέμεινε από τη γλίστρα. Όλο αυτό το μέταλλο της γλίστρας περιβάλλεται από λάστιχο κανονικά και το μέταλλο ούτε καν που φαίνεται!
Και πού ήταν όλα αυτά τα κομμάτια που έσπασαν; Διασκορπισμένα στον κινητήρα. Τα βρήκα στο θάλαμο του συμπλέκτη, μέσα στην αντλία λαδιού, καθώς και στην υποδοχή της σήτας απ’ όπου περνάει το λάδι. Η υποδοχή αυτή είχε βουλώσει από τα πολλά λαστιχένια κομμάτια και προφανώς δεν περνούσε αρκετό λάδι από τη σήτα.
Μερικά από το κομμάτια που υπήρχαν στο θάλαμο του συμπλέκτη.
Και εφόσον δεν υπήρχε γλίστρα, για να δούμε πού τριβόταν η καδένα του εκκεντροφόρου για αρκετές εκατοντάδες χιλιόμετρα (ίσως και χιλιάδες).
Εκείνο το φαγωμένο μέταλλο κανονικά έχει πολύ περισσότερο υλικό. Γι' αυτό το φίλτρο λαδιού είχε γίνει όλο ασημί από τα πολλά γρέζια του αλουμινίου που κυκλοφορούσαν μέσα στον κινητήρα.
Επίσης από τα γρέζια βούλωσε και η σήτα λαδιού που βρίσκεται στο πλαίσιο, στο κάτω μέρος της σωλήνας που χρησιμοποιείται ως δεξαμενή λαδιού. Κοιτάξτε πώς έγινε!!!
Πού να περάσει λάδι από 'δω;
Δείτε την καθαρή για να καταλάβετε πώς θα έπρεπε να είναι.
Άρα, άλλος λόγος που επιβάρυνε την κατάσταση και τρύπησε το πιστόνι ήταν ότι έμεινε χωρίς λάδι, αυξήθηκε υπερβολικά η θερμοκρασία μέσα στον χώρο καύσης, οπότε προκλήθηκαν προαναφλέξεις, που δημιουργούν τεράστια πίεση στο χώρο καύσης κι έτσι δημιουργήθηκε η τρύπα. Σα να μην έφταναν όλα αυτά, όταν προετοιμαζόταν η μοτοσικλέτα για το ταξίδι, αφαιρέθηκε λίγο υλικό από το πάνω μέρος του πιστονιού, γιατί αυτό το πιστόνι ήταν πιο ψηλό απ’ ότι έπρεπε. Θυμηθείτε ότι η έκδοση της μοτοσικλέτας μου είναι τόσο σπάνια, που δε βρίσκονται εύκολα τα ανταλλακτικά της στην Ελλάδα κι έτσι είχαμε βάλει αυθεντικό πιστόνι της Honda από τα συνηθισμένα XR 250. Για να καταλάβετε πόσο υλικό αφαιρέθηκε, δείτε την πρώτη φωτογραφία του πιστονιού πάνω-πάνω, στην αρχή του κεφαλαίου της ανακατασκευής. Στο μέσα μέρος του πιστονιού (επάνω) υπάρχουν κάτι ανάγλυφες γραμμούλες. Αυτές σχημάτιζαν τη λέξη “IN”. Διαφωτιστική είναι και η σύγκριση με το καινούριο πιστόνι.
Βέβαια, η αφαίρεση του υλικού από το πιστόνι είναι το λιγότερο κι αν δε γινόταν, πάλι δε θα απέτρεπε την τρύπα, αφού όταν δε γίνονται σωστά οι καύσεις, προκύπτει πάντα μια τέτοια ζημιά.
Επομένως, ένα λάθος που είχε γίνει κατά την προετοιμασία της μοτοσικλέτας για το ταξίδι ήταν ότι αλλάξαμε τον εκκεντροφόρο και την καδένα του, αλλά έπρεπε να αλλαχτούν προληπτικά και ο τεντωτήρας και η γλίστρα. Βέβαια, τότε υπολόγιζα να κάνω ένα πολύ μικρότερο ταξίδι και δε φανταζόμουν πως θα καταλήξω να ταξιδεύω 73.000 χιλιόμετρα. Ήταν κρίμα, γιατί νόμιζα πως ο κινητήρας του XR είχε φτάσει στα όριά του. Όπως φάνηκε, όμως, αν το καρμπιρατέρ ήταν ρυθμισμένο σωστά και είχαν αλλαχτεί προληπτικά ο τεντωτήρας και η γλίστρα, το κινητηράκι αυτό θα μου προσέφερε αρκετές χιλιάδες χιλιόμετρα ακόμη. Σ’ αυτή την ανακατασκευή αντί να αφαιρέσω υλικό από το πιστόνι, αποφάσισα να αυξήσω λίγο το χώρο καύσης βάζοντας μια δεύτερη φλάντζα κάτω από τον κύλινδρο. Έτσι δε θα είναι πρόβλημα το λίγο παραπάνω ύψος του πιστονιού.
Οι βαλβίδες δεν είχαν τόση κάπνα όση περίμενα, αφού το λάδι που συμπλήρωνα με τα λίτρα, απλά διέρρεε από τις φλάντζες και μόνο μια μικρή ποσότητά του καιγόταν στον κύλινδρο. Οι δύο βαλβίδες εξαγωγής, όμως, είχαν κάποια μικρά βαθουλώματα στα σημεία εφαρμογής με την κεφαλή, οπότε αλλάχτηκαν.
Θυμάστε που σας είχα γράψει ότι στα τελευταία χιλιόμετρα διέρρεε τόσο λάδι, που ο αέρας το έφερνε μέχρι τη μπότα μου και την πλαϊνή βαλίτσα; Δείτε τι βρωμιά είχα να βγάλω από τον κινητήρα (και απ’ όλα τα υπόλοιπα εξαρτήματα).
Το σημαντικό ήταν ότι γλίτωσα τη ραγισμένη κεφαλή, γιατί αλλιώς δε θα μπορούσα να ξοδέψω τόσα χρήματα για να επισκευάσω τον κινητήρα. Τα XR έχουν τη φήμη ότι ραγίζουν την κεφαλή στο σημείο που βιδώνει το μπουζί και όλοι πίστευαν πως η δικιά μου θα είναι σίγουρα ραγισμένη και αυτός θα είναι ένας από τους λόγους που έπαψε να λειτουργεί ο κινητήρας. Το είχα ψάξει αρκετά το θέμα προτού επιλέξω αυτή τη μοτοσικλέτα για το ταξίδι μου. Αυτό που μου είχε πει έμπειρος και έμπιστος άνθρωπος της Honda ήταν πως ραγίζουν την κεφαλή όταν κάνουν σούζες και δεν ανεβαίνει λάδι στον κινητήρα, λόγω της κλίσης που παίρνει. Εγώ σούζες δεν έκανα ποτέ ούτε με το ποδήλατο, οπότε δεν κινδύνευα από κάτι τέτοιο. Όπως αποδείχτηκε από την άψογη κατάσταση της κεφαλής του κινητήρα μου, μάλλον ο άνθρωπος της Honda είχε δίκιο.
Για πάνω από δυο ‘βδομάδες στόχος μου ήταν να αδειάσω το αριστερό καφάσι, που είχε τα ανταλλακτικά που έβγαζα απ’ τη μοτοσικλέτα και να γεμίσω το δεξί καφάσι. Αφού τα καθάριζα υπομονετικά, τα περιποιούμουν και τα επισκεύαζα αν χρειαζόταν. Όταν ήταν έτοιμα, τα έβαζα στο δεξί καφάσι μαζί με τα καινούρια ανταλλακτικά που έρχονταν σιγά-σιγά. Ήμουν πολύ χαρούμενος, λοιπόν, όταν το δεξί καφάσι άρχισε να γεμίζει!
Στις δαγκάνες των φρένων άλλαξα προληπτικά τα λαστιχάκια των εμβόλων. Τα μέσα λαστιχάκια που εμποδίζουν το υγρό των φρένων ήταν καλά, αλλά τα έξω λαστιχάκια που εμποδίζουν τα χώματα ήταν αρκετά ταλαιπωρημένα.
Πάμε τώρα στο πλαίσιο. Πρώτα το πλένουμε με πετρέλαιο.
…και ιδού το αποτέλεσμα:
Τα κομμάτια που βλέπετε με διαφορετικό χρώμα είναι γιατί πριν το ταξίδι μου είχα βάψει το πλαίσιο χωρίς να αφαιρέσω όλα αυτά που αφαίρεσα τώρα. Έτσι η μπογά είχε πάει μόνο στα μέταλλα που δεν καλύπτονταν από εξαρτήματα.
Ύστερα χρησιμοποιούμε ένα μαγικό διαβρωτικό χρωμάτων, που το αλείφεις πάνω, περιμένεις λίγα λεπτά και το χρώμα ξεφλουδίζεται.
…το ξύνεις με μια σπάτουλα και το μεγαλύτερο μέρος του χρώματος φεύγει αφήνοντας αυτό το υπέροχο χρώμα του γυμνού μετάλλου. Τι απολαυστικό που είναι να βγαίνει το χρώμα τόσο εύκολα, χωρίς να τρίβεις για ώρες με τα γυαλόχαρτα…
Αφού έφυγε το χρώμα, το πλαίσιο πήγε σε συγκολλητή, για να περιποιηθεί ένα μεγάλο ράγισμα που είχε δημιουργηθεί γύρω από τη βάση του πλαγιοστάτη. Ήταν αναμενόμενο αν αναλογιστεί κανείς πως ο πλαγιοστάτης δε σχεδιάστηκε για να κρατά όλο το βάρος του XR μαζί με 90 κιλά φορτίο!
Ακολούθησε αστάρωμα και βάψιμο.
Έτοιμο!
Την εξάτμιση να μην τη βάψουμε; Πρώτα, όμως, χρειάζεται αμμοβολή, για να αφαιρεθεί το χρώμα, η σκουριά και η λάσπη που είχε ψηθεί πάνω στη ζεστή εξάτμιση και είχε γίνει ένα σώμα μ’ αυτήν.
Έτοιμη κι η εξάτμιση!
Τώρα πάμε σε κάτι που ούτε το ‘χα ξανακάνει ούτε καν είχα δει ποτέ κανέναν να το κάνει, αφού δούλευα σε συνεργείο για αυτοκίνητα και τα αυτοκίνητα δεν έχουν μπουκάλες για ανάρτηση. Με μόνη μου βοήθεια το manual, λοιπόν, αποσυναρμολόγησα πλήρως τις μπουκάλες, άλλαξα το λάδι τους και πάνω απ’ όλα τις τσιμούχες και τις ξύστρες τους, γιατί προς το τέλος του ταξιδιού έχαναν λίγο λάδι από ‘κει. Ήμουν πολύ προσεκτικός με όλα αυτά τα εξαρτήματα της ανάρτησης, αλλά τώρα το έμαθα κι αυτό και μπορώ να το ξανακάνω άνετα.
Μετά από αρκετό τρέξιμο και αναμονή μέχρι να βρεθούν τα αυθεντικά ανταλλακτικά, τα είχα επιτέλους στα χέρια μου! Μια από τις αγαπημένες μου στιγμές της ανακατασκευής ήταν όταν άνοιγα όλα εκείνα τα ακριβοπληρωμένα σακουλάκια της Honda και τα τοποθετούσα ένα – ένα στον κινητήρα. Έτσι είναι: οι γυναίκες κάνουν shopping therapy με ρούχα κι εγώ με ανταλλακτικά 😉
…και τώρα βάζουμε τον κύλινδρο προσεκτικάααα
Για να σφίξω το παξιμάδι της καμπάνας έπρεπε με κάποιον τρόπο να εμποδίσω την καμπάνα να περιστρέφεται. Το κόλπο με το πανί που μπλοκάρει τα γρανάζια το έκανα στο λύσιμο του κινητήρα, αλλά δεν ήθελα να το κάνω πάλι, γιατί θα ξαναγέμιζαν όλα με κομματάκια πανιού. Σκέφτηκα, λοιπόν, το εξής:
Έβαλα ταχύτητα στο σασμάν, τοποθέτησα το παλιό γρανάζι στον άξονα και το έπιασα με κάβουρα, οπότε η δουλειά έγινε ανώδυνα και αποτελεσματικά!
Και ναι, ο κινητήρας είναι μονταρισμένος! Έβαψα και το περίβλημά του, αλλά τον κύλινδρο, την κεφαλή και το καπάκι της δεν τα ‘βαψα, για να μη θερμομονώσει το χρώμα τις ψύκτρες και δεν ψύχεται αρκετά ο κινητήρας.
Στην επόμενη ανακατασκευή θα το κάνω chopper το XR! Κάπως έτσι θα φαίνεται:
Το πλαίσιο είναι έτοιμο να δεχτεί τον κινητήρα.
Μεγάλη η μέρα που βιδώθηκε ο κινητήρας στο πλαίσιο. Η χαρά που είχα δε λέγεται! Ένιωθα πως η μοτοσικλέτα μου σιγά-σιγά ολοκληρώνεται και σύντομα θα είμαι και πάλι πάνω της να αλητεύω στα βουνά και στα λαγκάδια!
Έκανα και μια ακόμη βελτίωση στον πλαγιοστάτη. Η μεγάλη επιφάνεια που του έδωσα στο κάτω μέρος του πριν το ταξίδι μου λειτουργεί άψογα στην άμμο και σε άλλα μαλακά εδάφη. Έπρεπε, όμως, να δώσω λίγο ύψος στον πλαγιοστάτη, γιατί η μοτοσικλέτα πλάγιαζε πολύ όταν τη στάθμευα και συνήθως έβαζα πέτρα από κάτω ή ό,τι άλλο έβρισκα εκεί. Πρόσθεσα, λοιπόν, δύο εκατοστά πολυουρεθάνης. Φαίνεται ιδανικό υλικό, γιατί είναι ελαστικό και γαντζώνει στο έδαφος καλύτερα από το μέταλλο και το τεφλόν.
Εν τω μεταξύ, ήρθε το φίλτρο αέρος της K&N, που παρήγγειλα από τη Γερμανία. Η συγκεκριμένη έκδοση του XR έχει ένα πολύ δυσεύρετο φίλτρο, το οποίο η Honda το δίνει στην παράλογη τιμή που όλοι περιμέναμε. Σκέφτηκα, λοιπόν, να βάλω ένα φίλτρο της K&N, που δε χρειάζεται ποτέ άλλαγμα. Παιδεύτηκα πολύ για να βρω το κατάλληλο. Ανακάλυψα ότι τα XR 250S (νομίζω και τα Baja, αλλά δεν το δοκίμασα) φοράν ίδιο φίλτρο με τα XR 650L που κατασκευάστηκαν από το 1993 και μετά. Ο κωδικός της Honda για το συγκεκριμένο φίλτρο είναι: 17214-MY6-670, ενώ της K&N είναι: HA-6592.
Επάνω βλέπετε το γνήσιο φίλτρο της Honda και κάτω αυτό της K&N.
Έχουν μπει σχεδόν όλα πάνω στο πλαίσιο της μοτοσικλέτας.
Τέλος, ήρθε η ώρα να τροποποιήσω το ηλεκτρικό κύκλωμα της μοτοσικλέτας. Αυτό το μοντέλο δεν έχει διακόπτη για να σβήνουν τα φώτα, επειδή προορίζονταν για την αγορά των Η.Π.Α.. Επίσης, τα μπροστινά φλας είναι μονίμως αναμμένα και αναβοσβήνει το ένα φλας, όταν το ανάψω για να στρίψω. Η μπαταρία σ’ αυτή τη μοτοσικλέτα είναι μικρή, δεν υπάρχει μανιβέλα για την εκκίνηση του κινητήρα και είχα και τα φώτα να μου ξοδεύουν την ηλεκτρική ενέργεια που ήταν πολύτιμη σε κάποιες περιπτώσεις. Αναγκαστικά, σε τέτοιες στιγμές αποσυνέδεα τα βύσματα των φώτων. Τοποθέτησα, λοιπόν, διακόπτη για να σβήνει ο μπροστινός προβολέας, το πισινό φως και το λαμπάκι που φωτίζει το κοντέρ. Μάλιστα, το έκανα έτσι, ώστε όταν ανάβω τα μεγάλα φώτα, να μένει αναμμένη και η μεσαία σκάλα. Όταν χρειαστώ για λίγο δυνατό φως θα φέγγουν δύο λάμπες των 55 Watts, αντί για μια που έφεγγε πριν. Ακόμη, τα μπροστινά φλας τα έκανα να μη μένουν αναμμένα και να δουλεύουν όπως έχουμε συνηθίσει στα μοντέλα που έρχονται στην Ευρώπη.
Μετά από ενάμισυ μήνα σκληρής εργασίας, η μοτοσικλέτα είναι πια έτοιμη για την πρώτη δοκιμή. Πάνω ένα χρόνο είχε να βγει από αυτή την πόρτα.
Στα παρακάτω βίντεο μπορείτε να δείτε τις μαγικές στιγμές της πρώτης εκκίνησης του ανακατασκευασμένου κινητήρα μου. Ήταν μεγάλη η χαρά μου όταν άκουσα μετά από τόσο καιρό αυτόν το γνώριμο ήχο του XR, που μου χάιδευε τ’ αυτιά καθώς ταξίδευα στην Ασία. Η σπουδαιότερη αιτία που κάνει έναν ερασιτέχνη (= εραστής της τέχνης) μάστορα να χαίρεται σε μια τέτοια περίπτωση είναι η ικανοποίηση που νιώθει όταν διαπιστώσει ότι έκανε βίδες μια ολόκληρη μοτοσικλέτα που δε δούλευε, την επισκεύασε, την ξανασυναρμολόγησε και δουλεύει!
Η ανακατασκευή μου πήρε δυο μήνες, από τους οποίους οι 40 μέρες ήταν εργάσιμες με 8 ώρες εργασίας την ημέρα κατά μέσο όρο. Η πιο χρονοβόρα και λιγότερο ευχάριστη εργασία ήταν το καθάρισμα όλων των εξαρτημάτων που έβγαζα από τη μοτοσικλέτα. Για πάνω από μια ‘βδομάδα έπλενα σχολαστικά ατέλειωτα εξαρτήματα με πετρέλαιο ή νέφτι κι αν χρειάζονταν, τα έτριβα με συρματόβουρτσες ή γυαλόχαρτο. Η πιο ευχάριστη εργασία ήταν το μοντάρισμα του κινητήρα! Τώρα πια χαίρομαι και πάλι το XR μου!
Εξερευνώντας την Ήπειρο με τη Χριστίνα.
Στο πέρασμα από τα Ζαγοροχώρια προς τη Βοβούσα.
Παρακάτω φαίνονται αναλυτικά οι εργασίες που έκανα κατά την ανακατασκευή αυτή.
Κινητήρας
- Ρεκτιφιέ
- Αλλαγή πιστονιού
- Αλλαγή πίρου πιστονιού & ασφαλειών
- Αλλαγή καδένας εκκεντροφόρου
- Αλλαγή τεντωτήρα καδένας εκκεντροφόρου
- Αλλαγή γλίστρας καδένας εκκεντροφόρου
- Αλλαγή ρουλεμάν εκκεντροφόρου
- Αλλαγή βαλβίδων εξαγωγής
- Τρίψιμο βαλβίδων
- Αλλαγή τσιμουχάκια βαλβίδων
- Αλλαγή o-rings στα στρόγγυλα καπάκια για ρύθμισμα βαλβίδων
- Αλλαγή κοκοράκι βαλβίδας εξαγωγής προς το συμπλέκτη μαζί με το ρεγουλατόρο του
- Αλλαγή αντλίας λαδιού
- Αλλαγή φλαντζών σασμάν – κυλίνδρου, κυλίνδρου – κεφαλής και κεφαλής – καπακιού
- Αλλαγή μπουλονιού κυλίνδρου δίπλα στο μπουζί απ’ τη μεριά του συμπλέκτη
- Αλλαγή μπουλονιού κεφαλής μπροστά από το μπουζί
- Καθάρισμα σίτας λαδιού στο θάλαμο του συμπλέκτη και σίτας λαδιού στο πλαίσιο, εκεί που παίρνει το λάδι
- Αλλαγή ροδέλων της σωλήνας κάτω από τη σίτα λαδιού του πλαισίου
- Αλλαγή o-ring στο καπάκι του φίλτρου λαδιού
- Άνοιγμα πάσου για βίδες Ø 8 mm στο καπάκι του φίλτρου λαδιού
Μετάδοση
- Αλλαγή φλάντζας συμπλέκτη
- Αλλαγή παξιμαδιού καμπάνας
- Αλλαγή γλίστρας αλυσίδας πάνω στο ψαλίδι
- Αλλαγή γλίστρας αλυσίδας κάτω από το ψαλίδι, μπροστά
- Αλλαγή μπροστινού γραναζιού αλυσίδας κίνησης
- Αλλαγή τσιμούχας μπροστινού γραναζιού αλυσίδας κίνησης
- Αλλαγή τσιμούχας λεβιέ ταχυτήτων
Τροφοδοσία
- Αλλαγή καρμπιρατέρ με Keihin PD 73A από Honda XLR 250 του 1989
- Καθάρισμα καρμπιρατέρ
- Αλλαγή φλαντζών και o-rings του καρμπιρατέρ
- Αλλαγή βίδας αέρα στο καρμπιρατέρ με το ελατήριο, τη ροδέλα και το o-ring
- Τοποθέτηση ντίζας τσοκ
- Αλλαγή πλαστικού που ενώνει το καρμπιρατέρ με την κεφαλή και του o-ring του
- Αλλαγή φίλτρου αέρος
- Αλλαγή δεξιού ρακόρ στο ντεπόζιτο της Acerbis με universal ρακόρ Acerbis
Εξαγωγή
- Βάψιμο εξάτμισης
- Αλλαγή 2 ζουάν εξάτμισης
- Αλλαγή μπουζονιών εξάτμισης
Ανάρτηση
- Αλλαγή ρουλεμάν ψαλιδιού
- Αλλαγή αριστερού πίρου ψαλιδιού
- Γρασάρισμα ρουλεμάν συνδέσμου πισινής ανάρτησης
- Αλλαγή τσιμουχών, ξυστρών & λαδιού μπροστινής ανάρτησης
Πλαίσιο
- Βάψιμο πλαισίου
- Βάψιμο σχαρών
- Συγκόλληση γύρω απ’ τον πλαγιοστάτη
- Προσθήκη πολυουρεθάνης πάχους 2 εκατοστών κάτω από τον πλαγιοστάτη
- Αλλαγή κόκκινου πλαστικού πισινών φώτων
Τροχοί
- Αλλαγή ρουλεμάν μπροστινού τροχού
- Αλλαγή πισινού τροχού
- Αλλαγή ρουλεμάν και τσιμουχών πισινού τροχού
Φρένα
- Αλλαγή σωληνάκι πισινού φρένου
- Αλλαγή υγρών μπροστινού και πισινού φρένου
- Αλλαγή πισινής δισκόπλακας και τακακιών
- Αλλαγή λαστιχάκια στα έμβολα των δαγκάνων μπροστινού και πισινού φρένου
- Αλλαγή ελάσματος δαγκάνας πισινού φρένου στο σταθερό της μέρος, που πιάνει στο ψαλίδι
- Αλλαγή λαστιχένιου καλύμματος του άξονα της δαγκάνας του μπροστινού φρένου
- Αλλαγή εξαερωτήρα πισινής δαγκάνας
- Αλλαγή τσιμούχων στο λεβιέ του πισινού φρένου
Ηλεκτρικά
- Προσθήκη διακόπτη για να σβήνω τη μεσαία σκάλα στο μπροστινό φως και να μένει αναμμένη όταν ανάβω τη μεγάλη σκάλα και να σβήνει το πισινό φως και το φως του κοντέρ
- Τροποποίηση των μπροστινών φλας για να μην ανάβουν πάντα και να λειτουργούν όπως και τα πισινά
- Κόλληση της ασφαλειοθήκης για το GPS
- Αλλαγή λαμπτήρα ένδειξης μεγάλης σκάλας
Αξεσουάρ
- Καθάρισμα κοντέρ
- Αλλαγή ντίζας κοντέρ
- Καθάρισμα βαλιτσών και επισκευή των φώτων


 Loading...
Η ομιλία μου στο TEDx Komotini

Ντοκιμαντέρ σχετικά με το greece2india

